Crockpot Beef, Broccoli and Bok Choy

In my latest efforts to eat healthy, I have been trying to not eat out or order in. Which was definitely hard after a whole week of eating out while on vacation. When I was making my grocery list for this past week, I had an intense craving for Chinese take out, and specifically beef and broccoli. I have no idea what they put in that stuff to make it so delicious, but it probably isn’t healthy. So after searching for several beef and broccoli recipes to satisfy my take-out craving, I pieced together my own crock pot version. I decided to throw in bok choy as well, because it sounded like a nice combination. And I’ll fit in my daily servings of veggies wherever I can get them.

Prep and Cook time – ~15 minutes prep plus 8 hours on low or 4 hours on high; plus 15 minutes on high

Servings: 4-5

What you’ll need:

3 green onions, chopped (white and green parts)

1 1/2 pounds of beef round steak, sliced into 1/2 inch strips

3 small heads of broccoli

1 bunch of bok choy (I ended up using only about half the bundle, but its all about your preferred broccoli to bok choy ratio)

1/2 cup water

1 3/4-ounce envelope of reduced sodium beef gravy mix

2 tablespoons reduced-sodium soy sauce

1 tablespoon ground ginger

1 tablespoon garlic powder

What to do:

Slice the beef and place it in the slow cooker. In a bowl mix together the water, gravy mix, soy sauce, ginger, and garlic. Pour mixture over beef. Cover and cook for 8 hours on high or 4 hours on law. 15 minutes before you’re ready to serve, cut the broccoli heads into smaller pieces and chop the bok choy into about 1 inch chunks. Put the veggies in the slow cooker and turn it on high for 15 minutes, or until broccoli is tender but still crisp. Serve and enjoy!

I hope you find this to be a satisfying alternative to take-out, especially if you’re attempting to make some healthy changes. It can be so difficult to change your eating habits, especially if you’re home alone and look forward to the idea of leftovers for lunch. And then maybe dinner again. There’s certainly nothing better than leftover pizza during the middle of a crazy work day. But don’t worry, this recipe warms ups well for lunch, too! And my co-workers were pretty impressed to find out that it was homemade!

Orzo and Asparagus Salad

I’ve been out of town – on vacation for spring break, visiting J – until yesterday. Vacation was FANTASTIC, but I’m awfully glad to be back in my own kitchen. Eating out is fun, but when you do it for a solid week, you start to crave something homemade.

This Orzo and Asparagus Salad is something that I adapted from this recipe over at Feasting at Home. It is light but filling enough to be a dinner, it can be served warm or cold, and it has a lovely combination of the acidity from the dressing and the olives balanced by the pasta and the feta. Oh, and it is pretty healthy, too. (Except, carbs, yeah yeah whatever I need my pasta.)

Prep and cook time: ~30 minutes

Servings: 4

What you’ll need:

1 bunch of asparagus

1 1/2 cups of orzo, uncooked

1/2 cup kalamata olives, pitted and sliced

1/2 cup feta cheese

2 green onions, finely chopped

For the Dressing:

1/3 cup olive oil

2 1/2 tablespoons Dijon mustard

2 tablespoons red wine vinegar

2 tablespoons lemon juice

1 teaspoon each of salt and pepper

What to do:

Preheat the oven to 425 degrees. Break the tough ends off of the asparagus (if you’ve never done this before, it is very easy – you can just snap the bottom inch or so off with your hands). Put some tin foil on a cookie sheet, spread the asparagus out on the tin foil, give them a light coating of olive oil, and put in them in the oven for 20 minutes.

While the asparagus is cooking, bring a pot of water to boil. Cook the orzo according to the package directions (about 10 minutes). Drain the orzo and put it in a large bowl. Chop up the green onions and the olives.

Make the dressing by whisking all of the dressing ingredients together in a small bowl.

When the asparagus is done, chop it up into bite sized pieces. Mix the asparagus, onion, and olives in the bowl with the orzo. Mix in the dressing. Sprinkle feta cheese on top and serve warm, or cover and chill.

After a wonderful week of gourmet meals at fancy restaurants (ok, and a couple not so fancy ones that might have included several colorful cocktails), it was so relaxing to cook a simple meal in my own kitchen. I hope you enjoy this recipe as much as I did!

Chocolate Peanut Butter No Bake Cookies

My latest efforts at weight loss have been successful, which is fantastic. I won’t be bikini ready for my trip to Florida in a week, but hey – I’m in law school, I deserve cookies. Tonight after eating my healthy leftover soup I wanted a sweet treat. After perusing my Pinterest board, I decided that no bake cookies sounded perfect.

I’ve actually never made no bake cookies before, which is silly because they’re so easy. I was a little short on some of the ingredients that most recipes call for – I had no milk or chocolate chips. But I couldn’t resist the chance to improvise, so I looked at a few recipes and decided to wing it myself.

Chocolate Peanut Butter No Bake Cookies

What you’ll need:

1/2 cup butter

1/4 cup half and half

1 cup Splenda or regular sugar

3 tablespoons cocoa powder

1/2 cup peanut butter

1 teaspoon vanilla

2 cups of quick oats

Prep time: less than 10 minutes          Set time: 30 minutes

Calories: 217 per cookie*

What to do:

Melt the butter in a pot over medium heat. Add the half and half, cocoa powder, and the Splenda and mix well. Turn the heat up and let the mixture boil for 3 minutes. After 3 minutes, turn the heat off and add the peanut butter and vanilla, letting the peanut butter melt in, mixing well. Add the quick oats and stir well. Drop two tablespoons at a time onto wax paper, and put them in the fridge for 30 minutes.

* A note on the calorie count – I am not a nutritionist, a doctor, or even a super sophisticated foodie. I wanted to know the calorie count for my own purposes, so I calculated it all out based on the labels of my ingredients and the 2 tablespoon serving size per cookie that I used. So, know that this is an estimate, and may vary depending on what brand of ingredients you’re using. But, it’s an accurate ball-park for your informational purposes.

After seeing the calorie count per cookie, next time I will be cutting down the butter and maybe putting in less cocoa powder and peanut butter. But this evening, while I have about 40 pages to read for International Financial Regulation, I’ve decided that one 217 calorie cookie is fine by me.

Happy snacking!

Sausage, Kale, and Black Bean Soup

I was definitely late to the kale party. I’ve had it a few times, but always in the company of another vegetable – usually in the pre-packaged bags of mixed greens from the grocery store where kale is mixed in with lettuce, spinach, and arugula. I bought a big bag of it in the raw last week and packed a salad for lunch the morning that I got sick. By the time I got back to my house, I was so sick that I didn’t take the time to fully unpack my car, and my lunch stayed there overnight. My poor kale leaves froze. And then thawed. And I can tell you with utmost certainty, thawed, decaying kale leaves are one of the WORST smells that I have EVER encountered. I had to double bag the garbage, throw it outside, Febreeze the whole kitchen, light a candle, and turn on the overhead fan. And it still took a day for the smell to wear off. It turned my stomach so much that I couldn’t even look at the rest of the kale in the fridge for a few days. Tonight I finally got over it, but not enough to eat it raw. The solution? Soup!

Sausage, Kale and Black Bean Soup

What you’ll need:

5 cups of vegetable or chicken broth

5 cups of water

1 pound of sausage (I used our own homemade pork sausage)

1 can of diced tomatoes

1 can of black beans

1 white onion, chopped

5 cups of kale, roughly chopped

4 cloves of garlic, thinly sliced

1 tablespoon of black pepper

1 teaspoon of salt

1 1/2 teaspoons of fennel seeds *

1 teaspoon of dried thyme

Prep and Cook Time: 1 hour

Servings: 5

What to do:

Take the sausages out of the casings and break them up into quarter sized chunks, or slice it thinly. Put about a teaspoon of olive oil in a pan and brown the sausage, cooking it through. Meanwhile, put about a teaspoon of olive oil in a large stockpot. Chop up the onion and slice the garlic and put them in the stockpot, cooking about 5 minutes. Add the broth, water, tomatoes, and black beans to the stock pot. Roughly chop the kale and add it to the broth. When the sausage is cooked through, add it to the soup. Add the pepper, salt, fennel seeds, and thyme. Simmer on medium low heat for 30 minutes.

*A note about the fennel seeds – most sausage that you buy in the store, like hot Italian sausage, has a lot of fennel in it already. Fennel can be a very overwhelming flavor if you use too much of it. I used 1 1/2 teaspoons because I was using homemade pork sausage that had very little seasoning in it to begin with. If you’re using store bought sausage, I would recommend decreasing the amount of fennel, to one teaspoon or even a half a teaspoon, depending on what kind of sausage you’re using.

kaelsausagesoup3

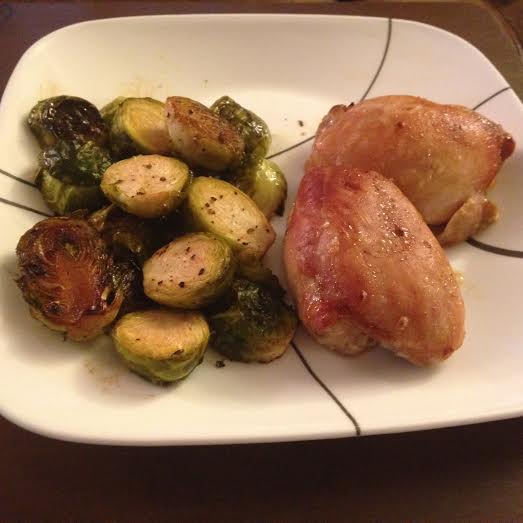
Honey Soy Chicken with Balsamic Roasted Brussels Sprouts

Late Wednesday night, after my steak with garlic mushroom bok choy, I came down with a nasty stomach bug. Or the flu, the jury is still out. Thursday morning on my way to work I became violently ill on the side of the highway. It was…..not suitable to recount in a food blog. I ended up leaving work early on Thursday and sleeping for over twelve hours. Thursday I wasn’t able to eat anything at all, Friday I was only able to drink straight chicken broth, and by Saturday I had graduated to soup. This morning was the first morning that I was able to drink coffee (a miracle, that) and I had this lovely chicken and a bunch of brussels sprouts waiting in the fridge, so I decided to venture back into real, solid food. I’m still exhausted and generally worn out, but never to tired to cook!

As long as the cooking requires little effort, of course. I used this recipe for a lovely honey soy marinade, and I didn’t change a thing about it. My only post-dinner comment would be that, if you use a three pound package of chicken, there isn’t quite enough marinade to get a good solid coat over everything (at least I think). But it was still absolutely delicious.  This recipe was actually out of character for me, because I generally don’t use honey outside of desserts. But I love soy sauce. My hesitation for honey is because I usually find “sweet and sour” combinations to be far too much sweet, not enough sour, but this recipe does a good job of balancing the soy and honey by sticking to a simple 1:1 ratio.

I’ve also recently developed a taste for brussels sprouts. It is tricky, though, to get them to a point of being soft enough to pleasantly eat, without charring them beyond recognition. The natural nutty flavor of the sprouts quickly becomes overpowering if they’re over-cooked. This recipe is very simple and the cooking time is spot on. The acidity from the vinegar deliciously compliments the natural flavor of the sprouts. Not as good as brussels sprouts roasted in duck fat (that was a special New Year’s meal, shortly before I started this blog, but maybe I’ll post it anyways), but still scrumptious! Especially for a veggie.

Overall, this was a lovely, simple, delicious meal and I would highly suggest both recipes. And now that my stomach is cooperating again, it was an excellent transition back into real food.

Now, I believe there are some real Girl Scout Cookies in the cupboard that would aid my ongoing recovery…….

Steak with Garlic Mushroom Bok Choy

I had an unexpected day off today. Both of my classes were cancelled because my professors were out of town, which really worked in my favor because in the middle of the afternoon the weather turned nasty and I would not have been happy to drive home in it. More cooking time for me!

On my last grocery shopping trip, I focused my list on foods that I have been looking forward to trying, but I knew J would not be thrilled about. So, first up, a red wine vinegar and soy marinaded flat iron steak. The recipe is extraordinarily simple: 1/2 cup soy sauce, 1/2 cup red wine vinegar, a pinch of salt and pepper. That’s it! I’m accustom to marinades that have a teaspoon of everything in them, so this was refreshingly easy to throw together. The end result, however, was only ok. Not bad, but not super exciting. The 1:1 ratio of the salty soy to the tangy vinegar blended a little too well, and it seemed to turn into a one unexceptional flavor. But hey, that’s why we experiment.

The bok choy, on the other hand. Oh my goodness. Who new such a simple veggie could taste so amazing! I have never worked with fresh bok choy. I wasn’t really sure what to expect. Bok Choy itself does not have a ton of flavor, but sauteing it creates a really wonderful crunchy, fresh texture, and it soaks up any other flavor you give it.

Another super simple recipe: Rough chop 8 oz of mushrooms of your choice (I wanted shitake, but the store didn’t have any, so I used baby bellas). Put a teaspoon of olive oil in a wok or large pan and put in the mushrooms. Chop or mince 4-5 cloves of garlic and add to the mushrooms. Rough chop the bok choy and add to the mushrooms and garlic. Add one teaspoon of lemon juice, and a pinch each of salt and pepper. Let this all saute until the boy choy wilts. Serve and enjoy!

I know! So easy, right! Easy, fast, and healthy! Sometimes you don’t need fifty ingredients and every kitchen utensil you own to enjoy a delicious home cooked meal.

Mushroom Bacon Frittata

Originally, I intended to make the Frittata with Tuna and Tomatoes out of Giada de Laurentiis’ cookbook, “Giada’s Feel Good Food.” It is a very health-focused, easy-to-follow cookbook with gorgeous photography. But I don’t like tomatoes, generally, unless they are in sauce form. And although I love tuna, I’m not sure it sounds like a great pairing with eggs. So I dug around my fridge for a few substitutes, and came up with mushrooms, which both J and I love, and leftover bacon from yesterday’s breakfast.

Mushroom Bacon Frittata

8 eggs

1/4 cup milk (the original recipe calls for whole milk. I used skim milk and added a little extra butter to make up for it)

1 tablespoon dried parsley

1/2 teaspoon salt

1/2 teaspoon pepper

1 tablespoon olive oil

1 tablespoon butter

5-6 pieces of cooked bacon, roughly chopped

1 cup mushrooms, roughly chopped

1/2 cup sharp cheddar cheese, shredded

Prep and Cook time: ~25 minutes

Servings: 6

Position an oven rack in the middle of the oven, and preheat to 400 degrees. In a large bowl, whisk the eggs. Add the milk, parsley, salt and pepper and whisk again. Add in the mushrooms and stir thoroughly.

Melt the olive oil and butter in a large, oven safe skillet on the stove over medium high heat (a 7 on my electric stove). All of my normal pans/skillets have rubber handles and are not oven safe, so I ended up using my oven safe wok. The shape of the frittata ended up a little weird, but it didn’t change the cooking time.

Pour the egg and mushroom mixture into the pan and let it cook, WITHOUT stirring, for 5 minutes. Sprinkle the bacon and cheese on top, let cook without stirring for another 3-5 minutes. Then put the pan in the 400 degree oven for about 8-10 minutes. This will get the inside cooked through without burning the edges. When it is done in the oven, loosen the edges of the frittata with a spatula, and it should slide right out of the pan for you. Cut into wedges and serve!

J and I both really liked this (he said “Thank you for breakfast! Well, dinner. Both!”) and it was just so EASY. I can’t believe I haven’t made one before. And the beauty of it, is that you really can put anything you want in it. If you’re looking for something vegetarian, use mushrooms and spinach instead of bacon. Or go with the tuna and tomato combo from the original recipe. Or get spicy and add hot peppers and onions. The diversity of the dish makes it a good go-to dinner for someone with not a lot of time on their hands.

I had grand ambitions today to go on an organizing spree, and bake, and catch up on some studying. Instead I started out my day with energy, then was suddenly hit with an awful, depressed, grumpy mood. This isn’t unusual in and of itself, its just that I’m never sure when it will hit. This past week was very good – I got to go help Boo, J and I spent some great, fun quality time together, I relaxed and had some “me time” yesterday with my DVR. I’m super excited about our Valentine’s Day plans – going on a double date to a charity raffle dinner / dance. I have an interview for my dream job on Tuesday that I am very pumped for.

But, in the back of my mind I’m also thinking about J leaving. He is a state trooper, but he is also in the Guard. When we first moved to PA, I started school and less than a week later he left for the state police academy, which requires cadets to live down in Hershey, PA (far away from us) for six months. He was allowed to come home or have a guest visit every other weekend, and he was allowed to use his cell phone for 30 minutes per night. That was it, no texting, no computer, no freely coming and going. Two months after he graduated and came home, he left again, this time going away for the military for almost seven months. Then he came home and was sent away again for three weeks. Then for another three weeks, with no communication at all. Between early fall of 2012 and late spring 2014, he was home for a collective total of maybe four months. He was gone during almost the first full year of our marriage.

He’s been home for about nine months solid now, and the initial “re-adjustment,” as I started describing it, was extremely difficult. After two different houses and two years of law school essentially living by myself, I had a hard time learning just to share a space again, let alone the learning curve of compromise that comes with the first year of marriage. But we made it through, and late this spring we’ll be celebrating two years of marriage. It doesn’t sound like much, but to us, it’s the product of so much hard work.

Intellectually, I know I’m dreading his next stretch away with the military way more than necessary. It’s only eight weeks. Compared to what we’ve already been through, an almost insignificant amount of time. And at this point in our marriage, we are certainly stronger as a unit that we were the first time he left – emotionally, mentally, and financially. But maybe there’s an ingrained response that I’ve developed, something that triggers depression and stress, when anticipating another period of separation.

He leaves on February 15th. The past couple of days, he has mentioned casually that he wants to go out to dinner a few times before he leaves, that he doesn’t want me to stress too much about meals, and that he would love a few easy dinners that I used to make, back when we first started living together and before I started developing my cooking skills. He knows, without us having to discuss it, that I’m stressed at his impending departure. I know he wants me to handle these negative feelings by being in the moment when I do spend time with him in this week before he leaves, instead of bottling it all up and hiding out in the kitchen.

So this frittata was my first attempt this week at doing what he’s been asking me to do, even though he never actually asked. I’m cutting down my kitchen time so I can spend more time with him. But I’m still doing what I want to do, too – experimenting with recipes and finding the best way to express my love for him on a plate. And even though when he’s been gone in the past I’ve let the depression pin me down, that doesn’t mean the same thing has to happen this time. This time we’re stronger, I’m stronger, and my arsenal of culinary equipment is stronger.

Besides, when he’s gone, I’ll be able to eat the WHOLE frittata.

Spiced Venison Steak-Ums

My Healthy Lifestyle Change Efforts have been paying off recently (nope, still not calling it a diet), in the form of both lower scale readings and, this morning, a very sore knee. I’ve cut my mile time down quite a bit in the past two weeks, and in return the legs mutinied and demanded a day off. Without the gym time to factor into my day, I wanted something exceptionally lean for dinner.

Which led me to reach for venison again, but I was craving something other than a burger. We usually have multiple forms of venison in our fridge, so tonight I grabbed a bag of it in Steak-Um form. For those of you not familiar with Steak-Ums (I have absolutely no idea if that is a universally understood term, or if its something colloquial. Like Speedies, which are HUGE in the area of New York state where I grew up – but then I transplanted one state over and people looked at me like I had three heads when I asked where I could get Speedies), it is essentially a loin sliced extremely thin. Think of the slices of beef you’d find on a Philly Cheesesteak. And although I like the taste of venison au naturel, I was in the mood to jazz things up.

As well as attempting to keep my diet a little cleaner these days, I was desperate to get something into J that wasn’t ice cream, which has become his staple for the past week. He’s still very sore and can’t eat anything other than soft foods after getting all four wisdom teeth yanked last Monday, so ice cream is his best friend. I feel like an evil witch if I give him the side eye at his frequent trips to the freezer, because he looks at me with this innocent, pained face and cries “but my TEETH HURT!”

Ok, so, soft, healthy veggies. Whaddowegot? “Power Greens” mix! Which is a pre-bagged mix of spinach, kale, bok choy, arugula, and a few other dark green leafies that you can find pretty much anywhere. The spinach is the predominate flavor, so J eats it willingly. Cook that down and throw in a can of butter beans for more substance, and you’ve got a healthy, filling side dish. Good stuff!

Spiced Steak-Ums

Servings: 4

Prep and cook time: ~15 minutes

What you’ll need:

1/2 pound of venison or beef, thinly sliced

1 egg

4 tablespoons garlic powder

4 tablespoons chili powder

4 teaspoons dried dill

2 tablespoons olive oil

Heat one tablespoon of olive oil in a large pan over medium heat. When working with meat that is this thinly sliced, you don’t want your heat too high, or the meat will burn quickly. If you’re using an electric stove like I am, don’t get your heat above 6, at most.

Whisk an egg in a bowl. On a plate, thoroughly mix together 2 tablespoons garlic powder, 2 tablespoons chili powder, and 2 teaspoons dill. Working with one piece of meat at a time, dip the steak-um in the egg to coat, then roll each side of the steak-um in the spice mixture. I reserved half of the spices initially, because as you continue to put the egg-coated steak-ums in the spice mixture, the remaining mixture on the plate will become gummy consistency. You’ll want to add the rest of the spices about halfway through the process so that all of the meat gets an even layer. Same concept applies to that second tablespoon of olive oil – as the meat is cooking, some of the spice will end up coming off and gumming up the bottom of your pan. Add the second tablespoon of olive oil halfway through the cooking process, and even more if you think it is needed. If you don’t keep enough oil in the pan to coat the bottom, your spices will burn almost immediately.

Because they are very thin, the steak-ums will cook very quickly, so you’ll want to keep a sharp eye on them. Especially if you’re working with venison instead of beef – venison is much leaner, so it will dry out and burn much quicker than beef.

Sauteed Greens with Butter Beans

Servings: 2-3

Prep and cook time: ~10 minutes

What you’ll need

2 cups of dark leafy green of your choice (I used a pre-bagged mix, but straight spinach or kale would work great)

1 can of butter beans, aka great northern beans, aka cannellini beans (I don’t know either why they can’t just pick a name), drained and rinsed

1 teaspoon black pepper

1 teaspoon garlic powder

1/2 teaspoon salt

Super easy side dish here – put about 1 teaspoon of water in the bottom of a pot or a pan, doesn’t really matter, as long as you can put a lid on it. I used a wok. Put your greens in, put the lid on top, set the heat to the low side of medium (4 on my stove) and let the water steam the veggies until they’re wilted, stirring every couple of minutes. Once the veggies are wilted, throw in the butter beans. Leave the lid off to let the remaining moisture in the bottom of the pan cook off so you don’t have soggy beans – about 3 or 4 minutes. Mix in the black pepper, garlic powder, and salt. Let the spices warm up and cook in the mixture for another 2 or 3 minutes, and you’re ready to serve!

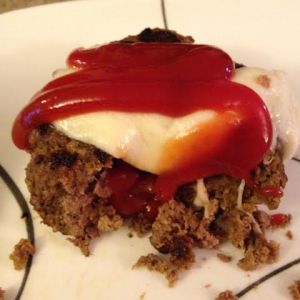
Mozzarella Curry Venison Burgers

I know what you might be thinking – Mozzarella and Curry and Venison? Weird combo! Which, it is. But its a YUMMY weird combo.

It was just me for dinner tonight, and I was looking for something pretty lean and healthy to balance out our fantastic meal out on the town last night with friends followed by the incredibly gooey chocolate brownie disaster. I had venison burgers planned along with veggie mac and cheese, but J not being home for dinner was an unplanned, last minute thing and I didn’t want to make mac and cheese all for myself. So, I figured venison burgers and a side of steamed broccoli sounded yummy and reasonable to cook for one.

The perk of J not being home for dinner is that I get to use CURRY. I LOVE curry. He doesn’t like it. You see my dilemma. Curry and venison gave me pause, but I figured, hey, I’ll try it. And I’m glad I did because it’s actually quite the delicious combination! The spiciness and slight nuttiness of the curry compliments the game-y taste of the venison, and the more smooth, basic flavor of the mozzarella balances out the meat and the spice and kind of brings them together and makes them get along. But then again, melted mozzarella makes anything amazing.

So here’s how you make Mozzarella Curry Venison Burgers!

Servings: 6

Prep and cook time: ~30 minutes

What you’ll need:

2 pounds ground venison

2 eggs

1/2 cup breadcrumbs (I used Italian seasoned breadcrumbs)

2 tablespoons curry powder

1 tablespoon black pepper

1 tablespoon garlic powder

6 slices of whole milk mozzarella

Put your thawed, ground venison into a bowl. Add the breadcrumbs and eggs and mix thoroughly. I usually just use my hands to mix things into raw, ground meat to make sure it is evenly distributed. Mix in the curry powder, garlic powder, and black pepper. Spray olive oil or some other type of cooking oil into a pan, put the pan on medium heat, and let the pan heat up for a couple of minutes. Form burger patties out of the ground venison and place them in the pan.

Venison is tricky to work with when its ground. Because venison is very lean, it won’t make a good burger by itself. Regardless of what other ingredients I use, when I make venison burgers I always mix in egg and breadcrumbs – 1 egg and 1/4 cup breadcrumbs per pound of venison. If you don’t, you’ll end up with a pan full of ground venison, because every time you try to move or flip your burger, the patty will fall apart. Also, if you’re pan frying instead of using a grill, always let your pan heat up on medium heat and let the burgers get a good initial sear. This will help keep them together as they continue to cook. But venison also burns easily on high temperature if you don’t watch it, so after you get a good sear on each side of your burger, turn the heat down to low. I have an electric stove, and I start the temperature on 5, then turn it down to 2 after I sear the burger.

So after you get a good sear on each side of your burger, turn down your heat and cover the pan. Make sure you let them cook until they reach an internal temperature of 160 degrees (any ground meat needs to reach a minimum internal temperature of 160 degrees to kill the bacteria that is distributed through the meat during the grinding process). My burgers took about 20-25 minutes to cook. During the last 2-3 minutes of cooking time, place a slice of mozzarella on each burger and cover the pan again to let the cheese melt. When the cheese is fully melted, serve and enjoy!

venisonburgers2

Garlic-Bomb Salmon

I love salmon. Hands down my favorite fish. I enjoy fish that has a real ‘fish’ flavor to it, and generally I’m not a huge fan of the blander fishes like flounder because it seems like the ONLY thing I taste is the topping/marinade. J was never a huge seafood eater before him and I got together because his parents aren’t that big into seafood. I, however, grew up in a household with a pescetarian – my dad has always eaten seafood, but not meat. Or as he put it, the “swimming, but no running or flying” diet. So, in an effort to diversify our diet in a healthy way, I’ve been leaning heavily on fish as of late. I actually had quite the flounder disaster last week (we’re not going to talk about it), and so I wanted to redeem myself with a nice salmon dish.

In deciding how to prepare my salmon, I leaned on J’s input again. Lately, he’s been on an intense garlic kick. Now, I love me some garlic as well. I’m of strong Italian descent, and garlic is one of our main food groups. Garlic was something that he always liked, but was never madly in love with. Then suddenly, about two weeks ago, EVERYTHING I put in front of him was met with “more garlic!”

Ok then! You want some garlic? You’re gonna get some GAAAAALICK!!!!

Servings: 4

Prep and cook: ~25 minutes

What you need:

4 salmon fillets (approximately 4 oz each)

1 tablespoon lemon-infused olive oil (or just regular olive oil with a dash of lemon juice would work)

1 teaspoon dried dill

1 teaspoon black pepper

~8 cloves of garlic (about two cloves per fillet, depending on how big your garlic cloves are)

Preheat your oven to 350 degrees. Put just a smidge of olive oil in the bottom of a glass baking dish (or, if you’re like me and don’t have a large square glass dish, put two fillets each in two round dishes). Place the fillets in the baking dish, making sure that none of them are touching each other. Brush the remainder of the olive oil over the fillets. I use D’Avolio lemon-infused olive oil (best Christmas present ever!). Sprinkle the dill and black pepper evenly over the fillets.

Then the fun part. Peel and slice up your yummy raw garlic and just lay those slices right on top of the fish in rows, getting two or three rows on each piece of fish. Just load right up on the garlic. Don’t be shy, now. Make sure that your top oven rack is at the halfway point of your oven – if you put this fish on a rack too close to the top of your oven, the garlic will just burn instead of cooking evenly and releasing all that good flavor. Put the fish in the oven, uncovered, for 20 minutes. Salmon is done when it flakes evenly with a fork, and is a light pink color.

I didn’t get a chance to snap a picture of my finished product because J swooped in on it too quickly. He was happy to finally get his major garlic fix! I hope you all enjoy this garlic-bomb recipe as much as we did!